Upa Poshmark seller, I can admit that becoming successful is somewhat of a learning experience. I mean, as a beginner I wasn’t very concerned with the details, but it was easy to get addicted once I started to earn the little bit of extra cash.
That is when I decided to pay attention to the more pivotal elements of being a Poshmark seller and I acquired a few tricks from all the things I learned along the way!
And since I was once a newbie myself, with very little idea of what I was doing, I’m going to share some of the things I learned that will make selling on Poshmark a little easier for you, and help you become a poshing success!
COVER SHOTS & PHOTOS
This is where it all begins, and I cannot stress how big of a difference your photos will make in the end.
So once you’ve actually made the decision to start selling items on Poshmark, your first task will be to create a listing that provides all the information about the item you’re trying to sell (which I will be getting into the do’s and don’ts of writing your descriptions later).
But before even that, you must produce at least one photo of your item to serve as your “cover shot”.
Now, your cover shot is the first thing a potential buyer will see, and the quality of that cover shot will determine whether or not they click on your listing and continue on to reading the items description, or if they just proceed to scroll past it with little interest at all.
Here are just a few examples of great cover shots from my own closet that I actually captured myself!


There are plenty of ways to create an incredible cover shot, but I’m just going to share my personal tactic, as well as the basic variables that are consistent in producing an A+ cover shot no matter how you decide to style them!
MY PHOTO TAKING STRATEGY
Even if you don’t have a fancy camera, you can produce beautiful cover shots just like mine. I actually use the 8MP camera on my cell phone for all my photos, and you can capture great images with any semi-decent camera as long as you know what you’re doing.
So recently I actually built a flat platform out of pallet wood and painted it white so I could use it as the backdrop for all of my cover photos (used in the first two photos I posted above).
Building a platform is in no way necessary however, I just decided to go the extra mile. Another great atlernative that I recommend using as a back drop are white towels or sheets, and white blankets or carpet work very well too.
Once I have my white backdrop of some sort, I lay out the item I’m selling in the very center and build a border around it using other items.
What I’m doing here is organizing my layout for the photo. The bordering items will not be fully seen in the actual picture, because I only want parts of them seen filling in from the edges of my photo. The only piece that will be fully pictured is the item in the center that I’m trying to sell.
For my layout, I like to use some kind of fake plant or flowers that I have around my house, and I always place it on the upper left hand side/corner of my sale item.
Now the way I design the rest of my layout is dependant on what the sale item is. For example, if I’m selling a shirt I will use a pair of denim jeans or shorts and place them on the bottom left hand side/corner of my layout at an angle. If I’m selling any kind of bottoms I will put a pair of shoes or a handbag on the bottom right hand side/corner instead.
I struggled with styling my layout when I first started out, but I found that the structure I described above always makes for a good photo. I usually use a handbag, pair of shoes, and a hat in each one of my photos as well, but you can experiment with your own layouts with whatever items you want!
Aside from the content IN the photo, there is also the quality of the photo itself that is just as important. That being said, natural light is the best light, and I refuse to use anything but.
So most of the time I will bring my wooden platform or my white backdrop outside and lay it flat on the ground somewhere that had a lot of light, but isn’t sitting in direct sunlight either. I find that cloudy and overcast days are the best for taking photos.
You can also open the blinds inside and lay your backdrop on the floor near a window in your home and take photos there!
Overall, you want your cover photo to clearly display the item for sale in it’s entirety. As a buyer, I hate cover photos that only show a portion of the actual item, or the item is folded and you can’t really tell what it even looks like! So try to show off the whole item in your cover shot, and be sure to take close up photos of size tags, and any damage it may have. Usually, when I click on a listing and it only has the one photo, I lose interest because my mind is filled with too many questions about what the rest of the item might look like.
LISTING DESCRIPTIONS
A good item description is one that leaves all of the potential buyers questions already answered, and gives a clear and accurate idea of the items condition and fit.
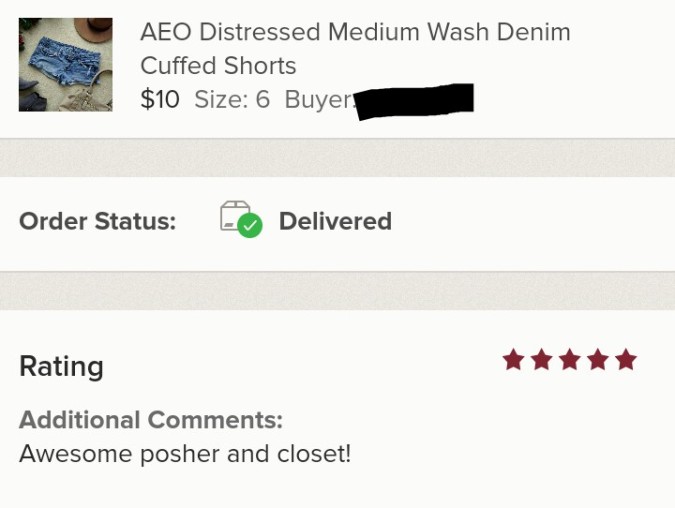
Here is a good example of an items description that I sold from my closet

The woman who ended up purchasing this item did not have to ask any questions prior to submitting her order, because all of her potential questions had already been answered within my description. She also left a 5 star review of her purchase once she finally received it!
If there is any damage to an item you’re selling, it is important that you mention it in your description. Otherwise, a buyer can open a claim stating your item was not as described and have the item returned to you, and their money will be refunded.
You also want to be honest and fair about the items original price and the price you’re asking for. Even if an item is new with tags, you don’t want to list the item as the same price you bought it for. You have to keep in mind that a buyer still has to pay for shipping as well, and it’s more likely an item will sell if you’re offering a good deal!
PACKAGING AND SHIPPING
Poshmark is pretty strict on it’s shipping policy, and if you fail to ship an item after 7 days then the order will automatically be cancelled and the buyer will be refunded their money.
It’s also important to ship your items fast to please the buyer, and quick shipping is a good way to have a customer return to your shop and buy from you again. If there is a shipping delay however, be sure to inform the buyer about the situation. Clear and honest communication is another way to gain a buyers trust.
Here is an example of positive communication between a buyer and myself regarding the shipping status of their order

Did you know that you never even have to go to the post office or leave your home to ship out your orders? Well, I have a little system in place that I use in order to provide my buyers with fast shipping service, and I never have to leave my home! It’s super easy and you can take advantage of this system too!
First, you want to make sure that you have packing boxes on hand, and it’s important that you stock up so that you’re prepared for new orders.
To do this, I go online to USPS and I order a package of their PRIORITY MAIL shipping boxes. These boxes come in a variety of sizes, and they are free and delivered right to your door. You can only use the boxes labeled Priority Mail, not Priority Mail Express, and you can’t use their flat rate shipping boxes either.
They usually sell in packs of 10-25, so you’ll have more boxes on hand whenever you need them. Don’t wait until you’re out of boxes to order more though, because it can take up to a week for them to be delivered to your home and you may need to ship out another item in that time.
You can also order different sized boxes to account for the different sized items in your closet. For example if I sell shirts and shoes in my closet, I may want to stock up on flat shaped boxes for the shirts and taller, more cube shaped boxes for shipping shoes.
Once you have your item packaged up, you can simply go online back to USPS and schedule a pickup by filling out the online form. Then, all you have to do is leave the package on the porch, or wherever you claimed it would be when you filled out the form, and the very next day the item will be picked up and shipped out! And guess what…This is completely free too!
So without spending a dime or stepping off of your property, you can ship all of your orders the very next day after they were made!
And if you really want to dazzle your buyer, do something nice with the packaging to make them feel special! Personally, I wrap my items in burgandy tissue paper and tie sheer ribbon around it and leave a bow on top! I also make my own personalized thank you cards on the computer and print them out on thick paper. In my card I thank the buyer for their purchase, give them a 15% off discount from their next purchase, and leave a little reminder for then to leave a review and some kind of feedback when they receive their item.
The last thing I do is add a little free gift as an extra thank you to the buyer, such as a small and pretty pair of stud earrings or lip balm. I put the free gift in a small envelope reading “please enjoy this free gift”, and stuff it underneath the ribbon on their already wrapped item, along with the thank you card.
Here is how everything looks once it’s all wrapped up and ready to go!


the extra mile will show your buyers you care and will increase your chances of selling to them again in the future! It can also spike your reviews and encourage them to leave “love notes”, which other users can see on your profile and can establish your positive seller reputation!
Now, I have only been selling on Poshmark for about 3 full months, and so far I have sold 28 listings, made around $280 dollars, and earned an average 4.7 star seller rating.
I have learned a lot within these past 3 months and I still have more to learn I’m sure. But these tips I’ve shared with you will be very helpful as you continue to expand your posh closet, and always remember that you can learn more and gain new ideas by studying other, more established closets in the community, and observing the way they present themselves when communicating with other poshers.
And for the most important and helpful tips of all, STAY ACTIVE! Interact with other poshers, share a few listings from someone else’s closet and they might return the favor. Follow new and suggested users, welcome new poshers to the community and offer a helping hand if they have any questions! Be kind and sociable with as many users as you can, and I guarantee that you will receive more attention to your closet then ever before!
So good luck, and I hope these tips come in handy for you in the future! And don’t forget to visit my Poshmark closet and take a look around yourself!

My bad, THIS is the correct link! ➡ https://poshmark.com/closet/lexidashiell
LikeLike
Great post! I just cleaned up my closet and I have a ton of clothes to sell. This is perfect.
http://www.akeylishlife.com
LikeLiked by 1 person
I’m glad I could help! 🙂 Remember to use code GOZXK when you sign up to earn $5 posh cash, and make sure you visit my closet when you get started! Here’s the link ➡ https://bnc.lt/focc/EbBID5QNMD
LikeLiked by 1 person
Pingback: Rainy Day Activities To Brighten Your Otherwise Gloomy Day! | VITAL FOR STYLE
Great covershots! I think I remember that hat one…I’ve shared it before!
LikeLiked by 2 people